System Flashing
NE503 系统首次烧录、引导链恢复、MCU 故障恢复和部署验证。
1. 准备固件和主机
1.1 下载固件
从 meta-hailo-os Releases 下载 hailo15-ne503 固件、BSP 和烧录工具 wheel,解压到 Ubuntu 主机。wheel 也可从 tools/ 目录下载。所有文件必须来自同一 Release。
完整文件说明见 NE503 firmware and deployment guide。
引导链文件(第 2 节使用):
hailo15_uart_recovery_fw.bin
hailo15_scu_bl.bin
scu_bl_cfg_a.bin
hailo15_scu_fw.bin
u-boot.dtb.signed
u-boot-spl.bin
u-boot-initial-env
customer_certificate.bin
u-boot-tfa.itb
系统镜像文件(第 3 节使用):
fitImage
swupdate-image-hailo15-ne503.ext4.gz
hailo-update-image-hailo15-ne503.swu
1.2 安装工具并连接设备
主机:Ubuntu 20.04/22.04。准备 1.8V 兼容 USB 转串口线、网线和 PoE。
pip install tools/hailo15_board_tools-<VERSION>-py3-none-any.whl
sudo apt-get update
sudo apt-get install u-boot-tools
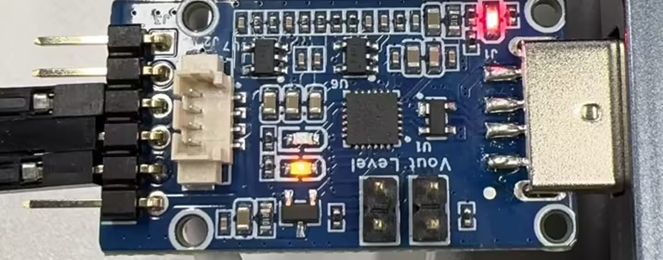
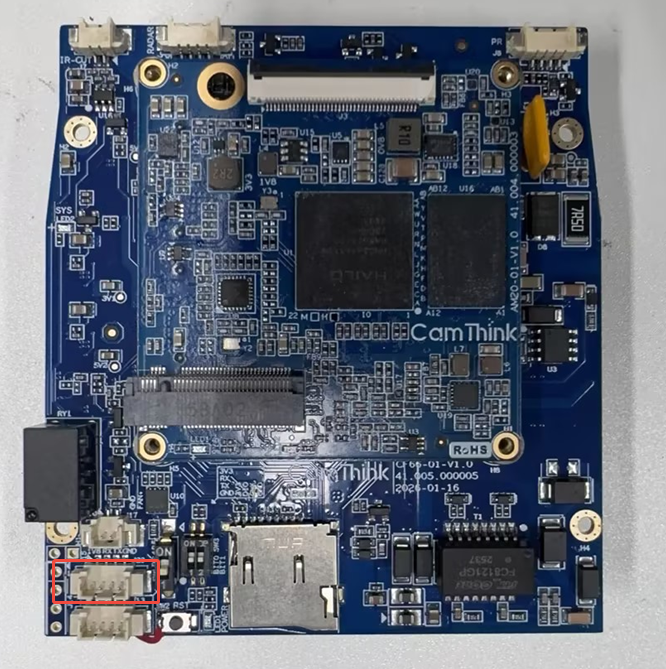
连接调试串口并确认设备节点:
ls -lh /dev/serial/by-id/
screen /dev/ttyACM0 115200
以下命令使用 /dev/ttyACM0,按实际节点替换。

1.3 配置 TFTP
sudo apt update
sudo apt install tftpd-hpa
sudo nano /etc/default/tftpd-hpa
确认配置:
TFTP_USERNAME="tftp"
TFTP_DIRECTORY="/var/lib/tftpboot"
TFTP_ADDRESS="0.0.0.0:69"
TFTP_OPTIONS="--secure"
复制系统镜像并重启 TFTP:
sudo mkdir -p /var/lib/tftpboot
sudo chown tftp:tftp /var/lib/tftpboot
sudo chmod 755 /var/lib/tftpboot
sudo cp fitImage /var/lib/tftpboot/
sudo cp swupdate-image-hailo15-ne503.ext4.gz /var/lib/tftpboot/
sudo cp hailo-update-image-hailo15-ne503.swu /var/lib/tftpboot/
sudo systemctl restart tftpd-hpa
2. 恢复引导链
全新设备或无 U-Boot 菜单时执行;已有菜单时跳到第 3 节。
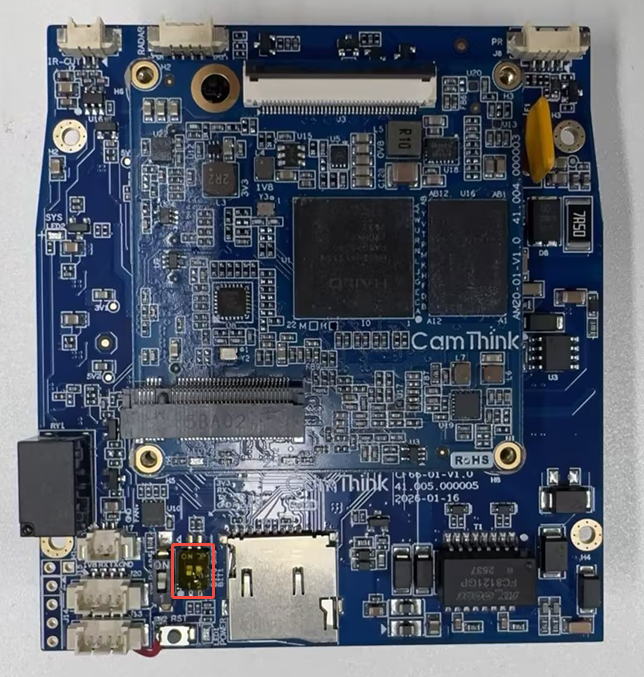
2.1 进入 UART 恢复模式
将拨码开关设为 BOOT0 OFF、BOOT1 ON,然后通过 PoE 上电并按下 Reset。
2.2 加载 UART 恢复固件
uart_boot_fw_loader \
  --serial-device-name /dev/ttyACM0 \
  --firmware ./hailo15_uart_recovery_fw.bin
2.3 写入 SPI Flash 引导组件
hailo15_spi_flash_program \
  --scu-bootloader ./hailo15_scu_bl.bin \
  --scu-bootloader-config ./scu_bl_cfg_a.bin \
  --scu-firmware ./hailo15_scu_fw.bin \
  --uboot-device-tree ./u-boot.dtb.signed \
  --bootloader ./u-boot-spl.bin \
  --bootloader-env ./u-boot-initial-env \
  --customer-certificate ./customer_certificate.bin \
  --uboot-tfa ./u-boot-tfa.itb \
  --uart-load \
  --serial-device-name /dev/ttyACM0
预期输出(节选,重复的擦除和校验行已省略):
UART recovery load firmware and script version: 1.4
flash detected, flash jedec_id: 0x9d701700
Programming SCU firmware file: ./hailo15_scu_fw.bin...
Provided file ./hailo15_scu_fw.bin was successfully programmed
Programming SCU bootloader file: ./hailo15_scu_bl.bin...
Provided file ./hailo15_scu_bl.bin was successfully programmed
Programming SCU bootloader config file...
Provided file ./scu_bl_cfg_a.bin was successfully programmed
Programming U-Boot SPL file: ./u-boot-spl.bin...
Provided file ./u-boot-spl.bin was successfully programmed
Programming U-Boot env file: ./u-boot-initial-env...
Provided file ./u-boot-initial-env was successfully programmed
Programming Customer certificate file: ./customer_certificate.bin...
Provided file ./customer_certificate.bin was successfully programmed
Programming u-boot device-tree file: ./u-boot.dtb.signed...
Provided file ./u-boot.dtb.signed was successfully programmed
Programming U-Boot & TF-A file: ./u-boot-tfa.itb...
Provided file ./u-boot-tfa.itb was successfully programmed
**成功:**8 个组件均显示 successfully programmed,且命令退出码为 0。
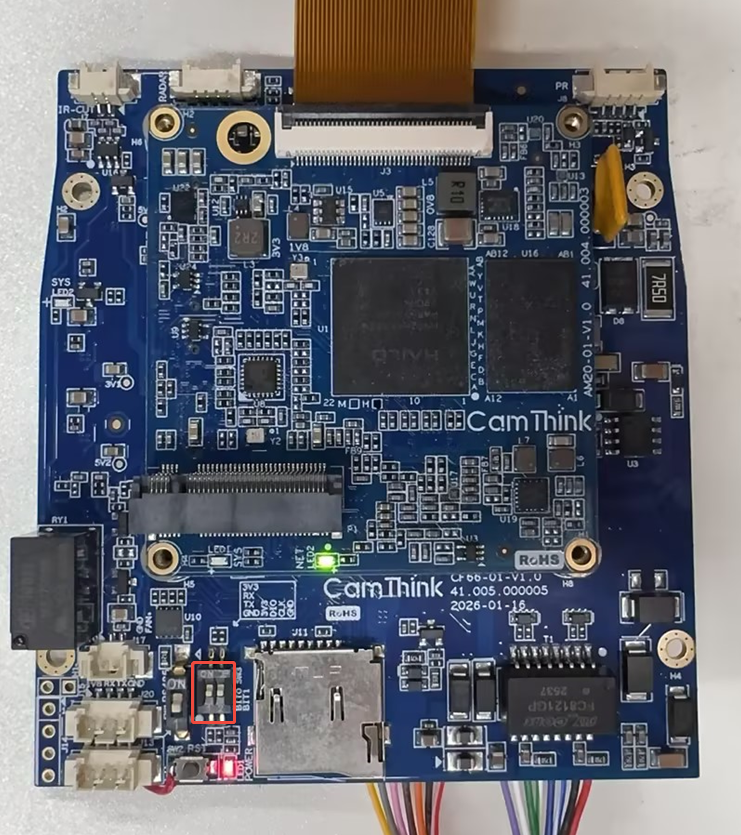
烧录完成后断电,将 BOOT0、BOOT1 恢复为 OFF,再重新上电。
3. 烧录系统到 eMMC
3.1 进入 U-Boot 菜单
- 通过 RJ45 接入 PoE 并上电;
- 串口终端设为
115200; - 在启动倒计时期间按
↑或↓进入 U-Boot 菜单。
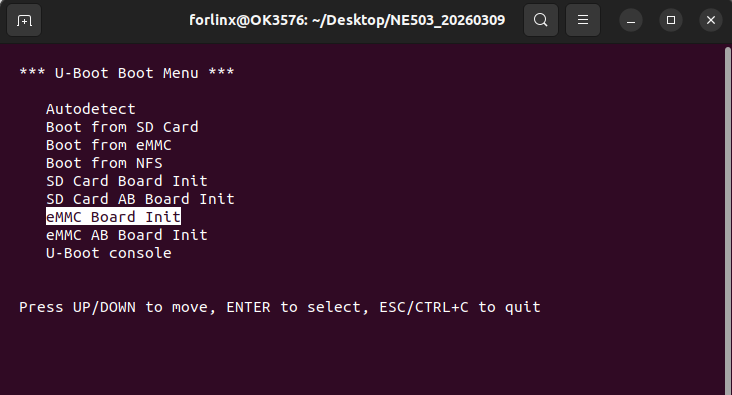
3.2 配置网络
先将运行 TFTP 的 Ubuntu 主机与设备接入同一网段。默认设备 IP 为 10.0.0.1,主机 IP 为 10.0.0.2;其他网段选择 U-Boot console:
setenv ipaddr 192.168.93.XXX
setenv serverip 192.168.93.YYY
saveenv
reset
serverip 填运行 TFTP 的主机 IP。
3.3 写入系统镜像
确认网络参数后,在 U-Boot 菜单选择 eMMC AB Board Init。如果刚执行过 reset,按第 3.1 节重新进入菜单。写入期间不要断电或断开网线;完成后设备自动重启。
4. 登录并验证
重启后通过串口或 SSH 登录:
用户名:root
密码:root
修改 root 默认密码并确认 OS 已启动:
passwd
cat /etc/os-release
当前系统镜像不包含 NE503 app,不使用 /data/aipc/VERSION、aipc 或 Hailo 模块作为烧录后的验证项。
**成功:**密码已修改,cat /etc/os-release 输出 OS 信息。
首次部署完成后,如 MCU 未烧录或设备无法正常运行,使用 ST-LINK 恢复 MCU。
5. 使用 ST-LINK 恢复 MCU
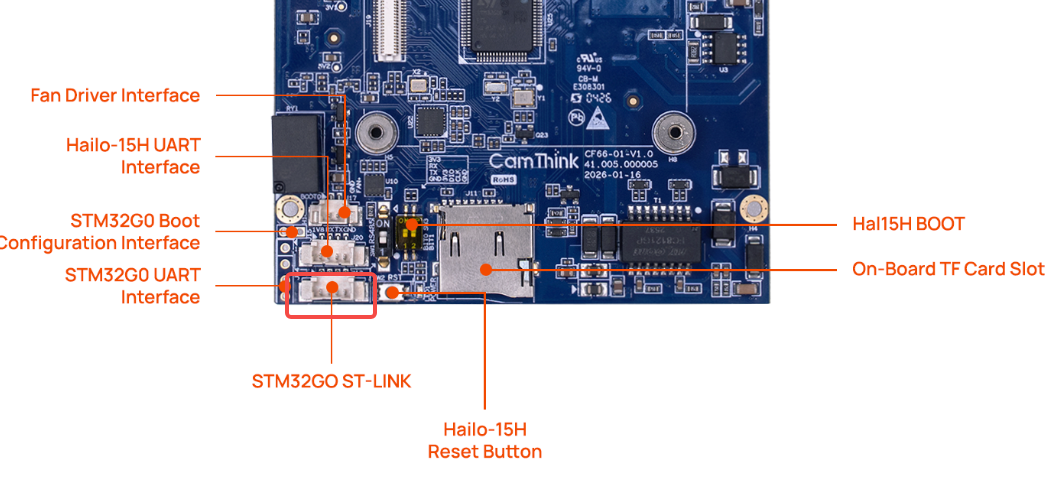
准备 ST-LINK、STM32CubeProgrammer 和设备电源。将 ST-LINK 接到接口板的 ST-LINK/SWD 接口:PA13 接 SWDIO,PA14 接 SWDCLK/BOOT0。设备保持正常启动模式。
下载并使用组合 HEX 文件 ne503_Main_v0.1.7_20260723.hex:
ne503_Main_v0.1.7_20260723.hex
确认主机识别 ST-LINK 和 STM32G0B0:
STM32_Programmer_CLI -l
STM32_Programmer_CLI -c port=SWD
烧录并校验:
STM32_Programmer_CLI -c port=swd -e all -w ./ne503_Main_v0.1.7_20260723.hex -v -rst
-e all 会擦除 MCU 全片内容。确认目标设备和固件文件后再执行。
**成功:**下载、校验完成,命令退出码为 0。完成后断开 ST-LINK 并重启设备。