System Flashing
NE503 initial system flashing, boot-chain recovery, MCU recovery, and deployment verification.
1. Prepare Firmware and Host
1.1 Download the Firmware
Download the hailo15-ne503 firmware, BSP, and flashing-tool wheel from meta-hailo-os Releases, then extract them on an Ubuntu host. The wheel is also available in the repository's tools/ directory. All files must come from the same Release.
See the NE503 firmware and deployment guide for the complete file list.
Boot-chain files (used in Section 2):
hailo15_uart_recovery_fw.bin
hailo15_scu_bl.bin
scu_bl_cfg_a.bin
hailo15_scu_fw.bin
u-boot.dtb.signed
u-boot-spl.bin
u-boot-initial-env
customer_certificate.bin
u-boot-tfa.itb
System-image files (used in Section 3):
fitImage
swupdate-image-hailo15-ne503.ext4.gz
hailo-update-image-hailo15-ne503.swu
1.2 Install Tools and Connect the Device
Host: Ubuntu 20.04/22.04. Prepare a 1.8V-compatible USB-to-serial cable, an Ethernet cable, and PoE.
pip install tools/hailo15_board_tools-<VERSION>-py3-none-any.whl
sudo apt-get update
sudo apt-get install u-boot-tools
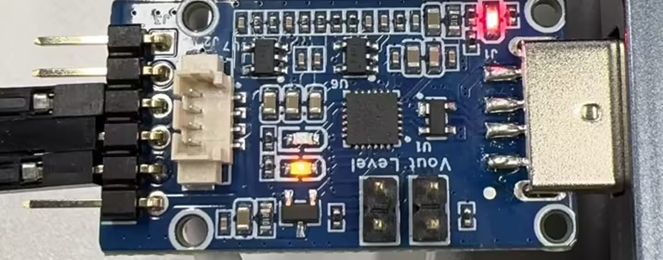
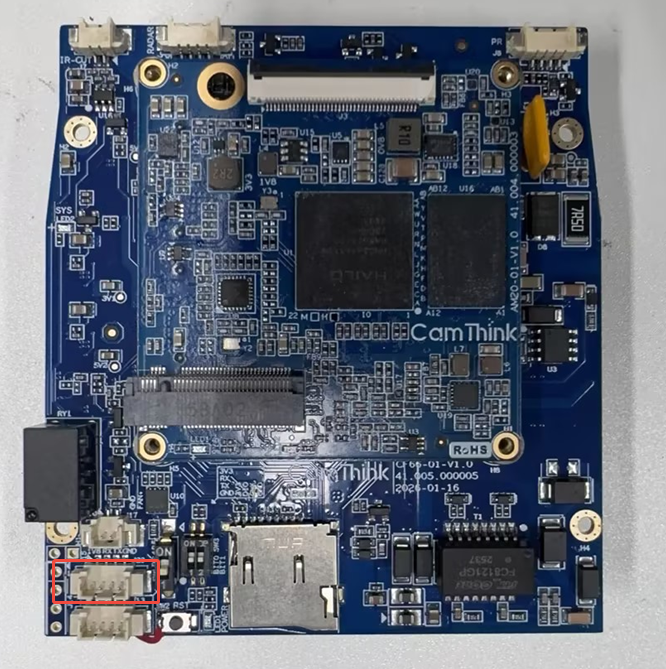
Connect the debug serial cable and confirm the device node:
ls -lh /dev/serial/by-id/
screen /dev/ttyACM0 115200
The commands use /dev/ttyACM0; replace it with the actual node.

1.3 Configure TFTP
sudo apt update
sudo apt install tftpd-hpa
sudo nano /etc/default/tftpd-hpa
Confirm:
TFTP_USERNAME="tftp"
TFTP_DIRECTORY="/var/lib/tftpboot"
TFTP_ADDRESS="0.0.0.0:69"
TFTP_OPTIONS="--secure"
Copy the system images and restart TFTP:
sudo mkdir -p /var/lib/tftpboot
sudo chown tftp:tftp /var/lib/tftpboot
sudo chmod 755 /var/lib/tftpboot
sudo cp fitImage /var/lib/tftpboot/
sudo cp swupdate-image-hailo15-ne503.ext4.gz /var/lib/tftpboot/
sudo cp hailo-update-image-hailo15-ne503.swu /var/lib/tftpboot/
sudo systemctl restart tftpd-hpa
2. Recover the Boot Chain
Use this section for a new device or when the U-Boot menu is unavailable. If it is available, skip to Section 3.
2.1 Enter UART Recovery Mode
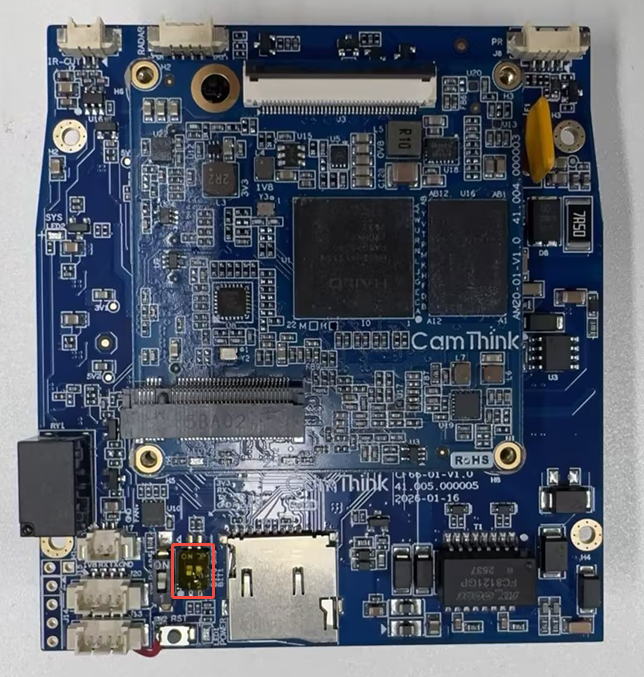
Set BOOT0 to OFF and BOOT1 to ON, power the device through PoE, and press Reset.
2.2 Load the UART Recovery Firmware
uart_boot_fw_loader \
  --serial-device-name /dev/ttyACM0 \
  --firmware ./hailo15_uart_recovery_fw.bin
2.3 Write the SPI Flash Boot Components
hailo15_spi_flash_program \
  --scu-bootloader ./hailo15_scu_bl.bin \
  --scu-bootloader-config ./scu_bl_cfg_a.bin \
  --scu-firmware ./hailo15_scu_fw.bin \
  --uboot-device-tree ./u-boot.dtb.signed \
  --bootloader ./u-boot-spl.bin \
  --bootloader-env ./u-boot-initial-env \
  --customer-certificate ./customer_certificate.bin \
  --uboot-tfa ./u-boot-tfa.itb \
  --uart-load \
  --serial-device-name /dev/ttyACM0
Expected output (excerpt; repeated erase and validation lines are omitted):
UART recovery load firmware and script version: 1.4
flash detected, flash jedec_id: 0x9d701700
Programming SCU firmware file: ./hailo15_scu_fw.bin...
Provided file ./hailo15_scu_fw.bin was successfully programmed
Programming SCU bootloader file: ./hailo15_scu_bl.bin...
Provided file ./hailo15_scu_bl.bin was successfully programmed
Programming SCU bootloader config file...
Provided file ./scu_bl_cfg_a.bin was successfully programmed
Programming U-Boot SPL file: ./u-boot-spl.bin...
Provided file ./u-boot-spl.bin was successfully programmed
Programming U-Boot env file: ./u-boot-initial-env...
Provided file ./u-boot-initial-env was successfully programmed
Programming Customer certificate file: ./customer_certificate.bin...
Provided file ./customer_certificate.bin was successfully programmed
Programming u-boot device-tree file: ./u-boot.dtb.signed...
Provided file ./u-boot.dtb.signed was successfully programmed
Programming U-Boot & TF-A file: ./u-boot-tfa.itb...
Provided file ./u-boot-tfa.itb was successfully programmed
Success: all 8 components show successfully programmed and the command exits with code 0.
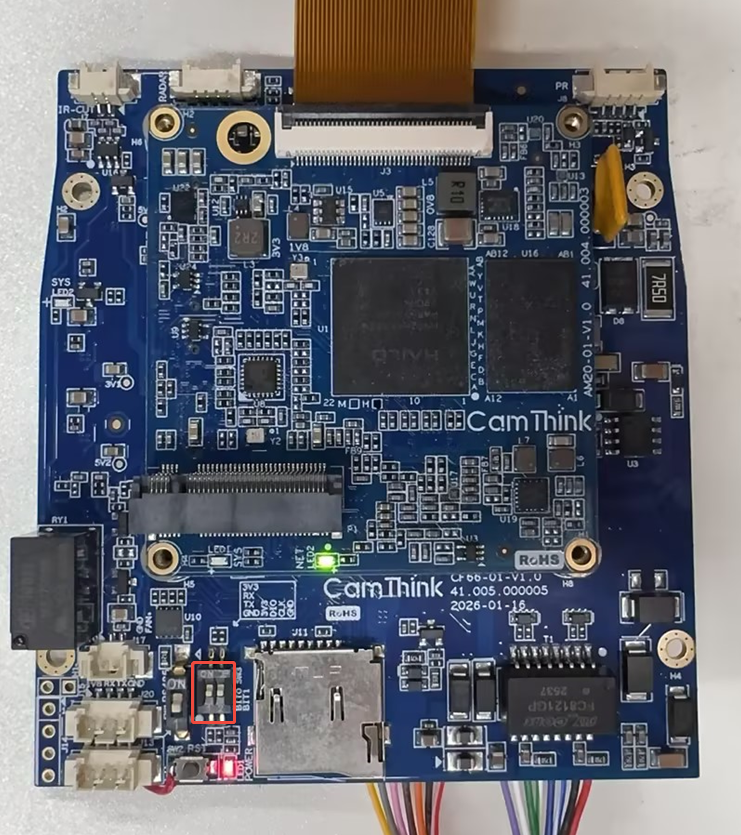
After flashing, power off the device, return BOOT0 and BOOT1 to OFF, and power it on again.
3. Flash the System to eMMC
3.1 Enter the U-Boot Menu
- Connect PoE through RJ45 and power on the device;
- Set the serial terminal to
115200; - During the boot countdown, press
↑or↓to open the U-Boot menu.
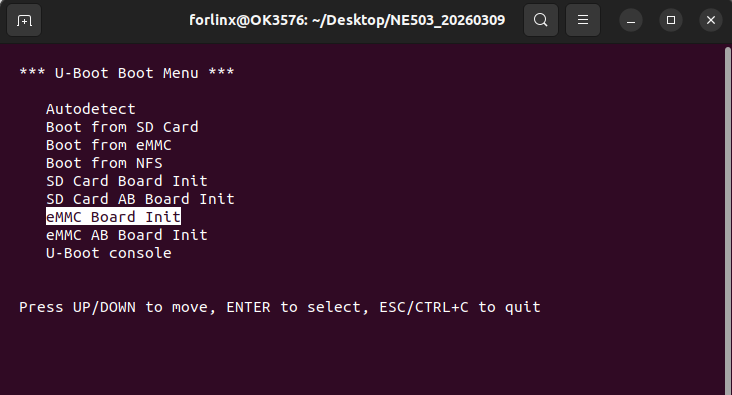
3.2 Configure the Network
Connect the Ubuntu TFTP host and the device to the same subnet. The default device IP is 10.0.0.1 and the host IP is 10.0.0.2; for another subnet, select U-Boot console:
setenv ipaddr 192.168.93.XXX
setenv serverip 192.168.93.YYY
saveenv
reset
Set serverip to the IP address of the host running TFTP.
3.3 Write the System Image
After confirming the network settings, select eMMC AB Board Init in the U-Boot menu. If you just ran reset, re-enter the menu as described in Section 3.1. Do not remove power or Ethernet during the write; the device reboots when complete.
4. Log In and Verify
After reboot, log in through the serial console or SSH:
Username: root
Password: root
Change the root password and confirm that the OS has started:
passwd
cat /etc/os-release
The system image does not include the NE503 app. Do not use /data/aipc/VERSION, aipc, or Hailo modules as post-flashing checks.
Success: the password is changed and cat /etc/os-release returns OS information.
After a first-time deployment, use ST-LINK to recover the MCU only when it is not programmed or the device cannot run normally.
5. Recover the MCU with ST-LINK
Prepare ST-LINK, STM32CubeProgrammer, and device power. Connect ST-LINK to the interface board's ST-LINK/SWD port: connect PA13 to SWDIO and PA14 to SWDCLK/BOOT0. Keep the device in normal boot mode.
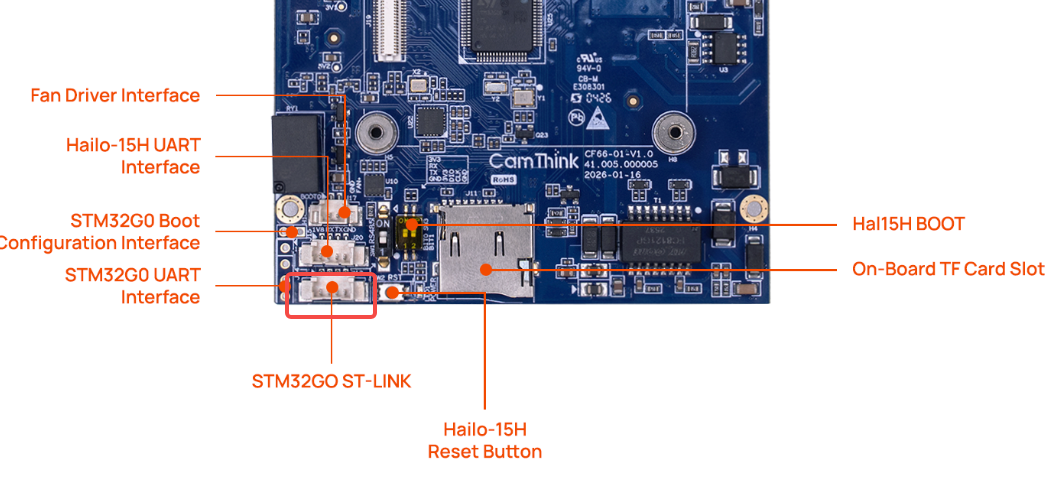
Download and use the combined HEX file ne503_Main_v0.1.7_20260723.hex:
ne503_Main_v0.1.7_20260723.hex
Confirm that the host detects ST-LINK and STM32G0B0:
STM32_Programmer_CLI -l
STM32_Programmer_CLI -c port=SWD
Flash and verify:
STM32_Programmer_CLI -c port=swd -e all -w ./ne503_Main_v0.1.7_20260723.hex -v -rst
-e all erases the entire MCU. Confirm the target device and firmware file before running it.
Success: download and verification complete with exit code 0. Disconnect ST-LINK and reboot the device.