自动化规则
规则引擎让 NeoMind 在无人值守时自动响应:设备数据越过阈值 → 自动通知、下发指令、触发 AI Agent。规则以 JSON 格式定义,通过 Web UI、CLI、REST API 或 AI Chat 创建。
NeoMind 的自动化页面包含两个页签:Rules(规则) 和 Transforms(数据转换)。本文档介绍 Rules,数据转换见 数据转换。
前置条件
界面概览
点击左侧导航的 Automation(分支图标)进入自动化页面,默认显示 Rules 页签:
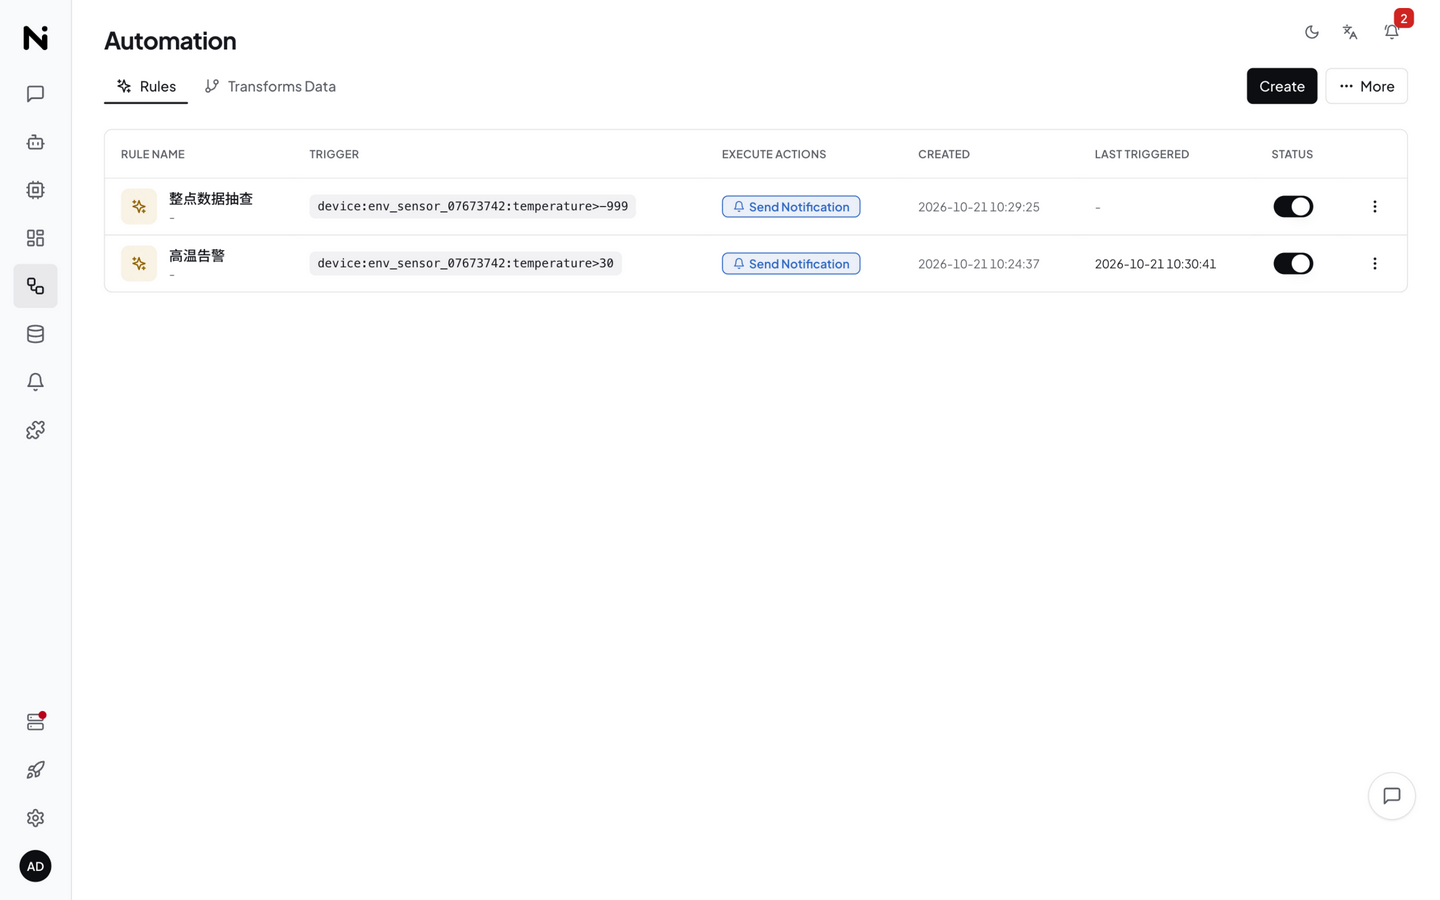
页面以表格形式展示所有规则,每行包含:
| 列 | 说明 |
|---|---|
| 规则名称 | 你设置的名称 |
| 触发器 | Data Change / Schedule / Manual |
| 条件摘要 | 规则条件的文本预览(如 temperature > 30) |
| 动作 | 该规则包含的动作列表(Notify / Execute / Trigger Agent) |
| 状态开关 | 启用 / 禁用切换 |
| 操作菜单 | 编辑、删除、立即执行 |
右上角的 Import / Export 按钮可批量导入导出规则 JSON。
规则结构
一条规则由四部分组成——名称、触发器、条件、动作(可选持续时间与冷却):
{
  "name": "高温告警",
  "trigger": { "trigger_type": "data_change" },
  "condition": {
    "condition_type": "comparison",
    "source": "device:sensor-01:temperature",
    "operator": "greater_than",
    "threshold": 30
  },
  "actions": [
    { "type": "notify", "message": "温度过高:{value}°C", "severity": "critical" }
  ]
}
完整 JSON 字段参考
{
  "name": "持续高温",
  "trigger": { "trigger_type": "data_change" },
  "condition": {
    "condition_type": "comparison",
    "source": "device:sensor-01:temperature",
    "operator": "greater_than",
    "threshold": 30
  },
  "actions": [
    { "type": "notify", "message": "温度持续高于 30°C 已 5 分钟", "severity": "critical" }
  ],
  "for_duration": 300000,
  "cooldown": 60000
}
创建方式
方式一:Web UI
步骤 1:打开规则构建器
在 Rules 页签点击 Create 按钮,打开全屏规则构建器:
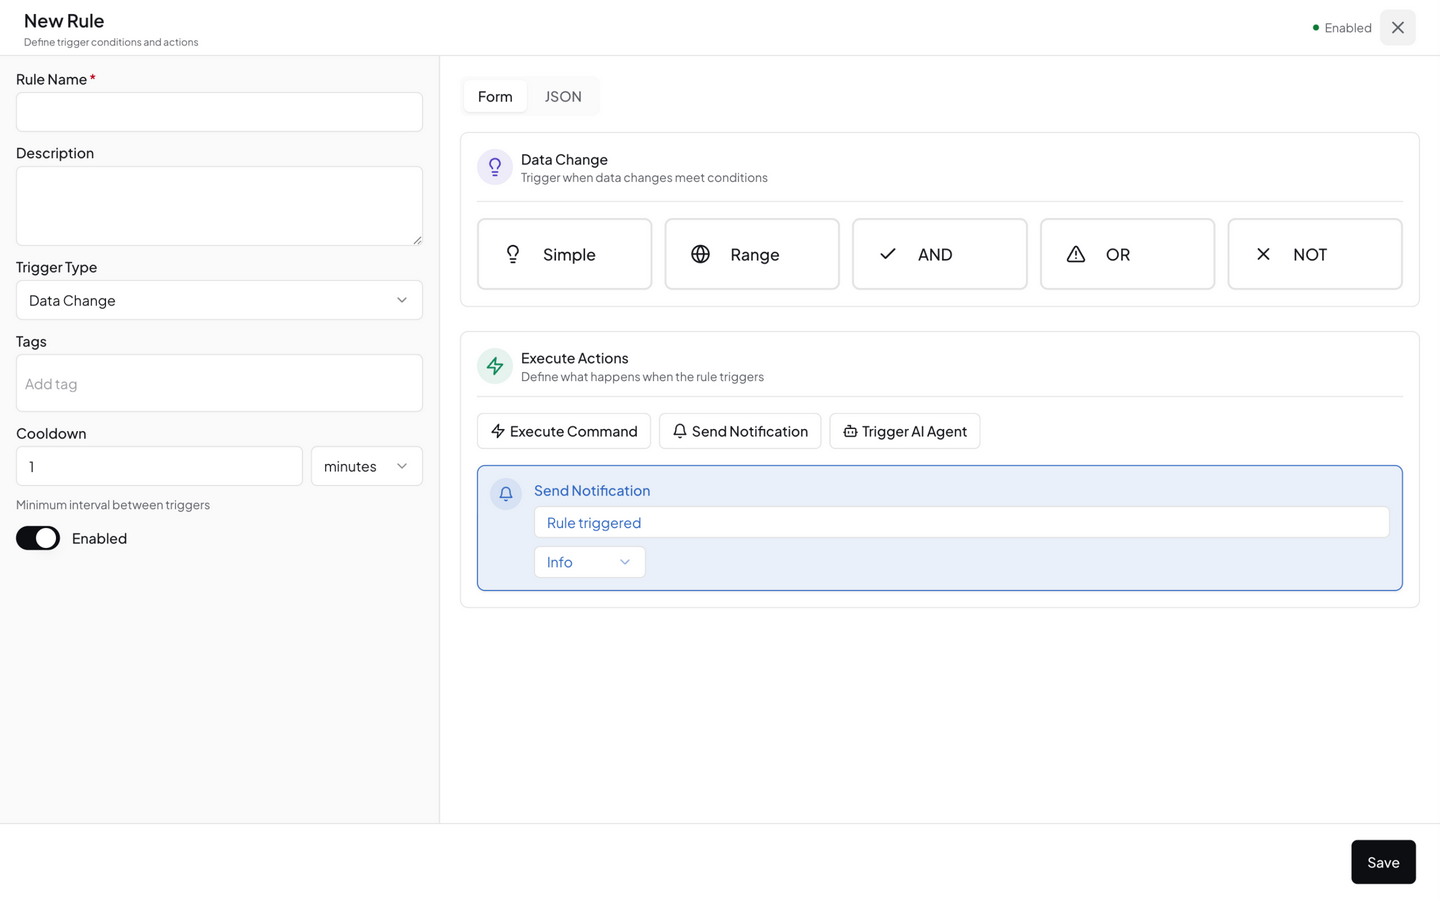
构建器为分栏布局,右上角可在 表单(可视化)/ JSON(代码) 之间切换——表单侧配置的每一项都实时同步到 JSON 预览。表单按 基础信息 → 触发条件 → 执行动作 → 预览确认 四步组织;条件以卡片形式添加:简单条件(单指标阈值)、范围条件(介于 min / max)、AND / OR / NOT 组合(嵌套子条件)。
构建器顶部填写:
| 字段 | 说明 |
|---|---|
| Name(名称) | 规则的显示名称 |
| Description(描述) | 可选,说明规则用途 |
| Trigger(触发器) | 选择触发方式(见下文) |
步骤 2:配置触发器
| 触发类型 | 说明 | 适用场景 |
|---|---|---|
| Data Change | 条件引用的指标有新数据时自动评估 | 实时告警、阈值监控 |
| Schedule | 按 cron 表达式定时触发 | 定时播报、周期性检查 |
| Manual | 仅手动触发(API / CLI / UI 按钮) | 调试、按需执行 |
Cron 表达式为 5 段:
分 时 日 月 周。"*/5 * * * *"= 每 5 分钟。(API 层也接受含秒的 6 段写法,会自动规整为 5 段语义;规则构建器 UI 按 5 段校验。)
data_change 触发器会自动从 condition 中提取引用的数据源,无需手动指定 sources。
步骤 3:配置条件
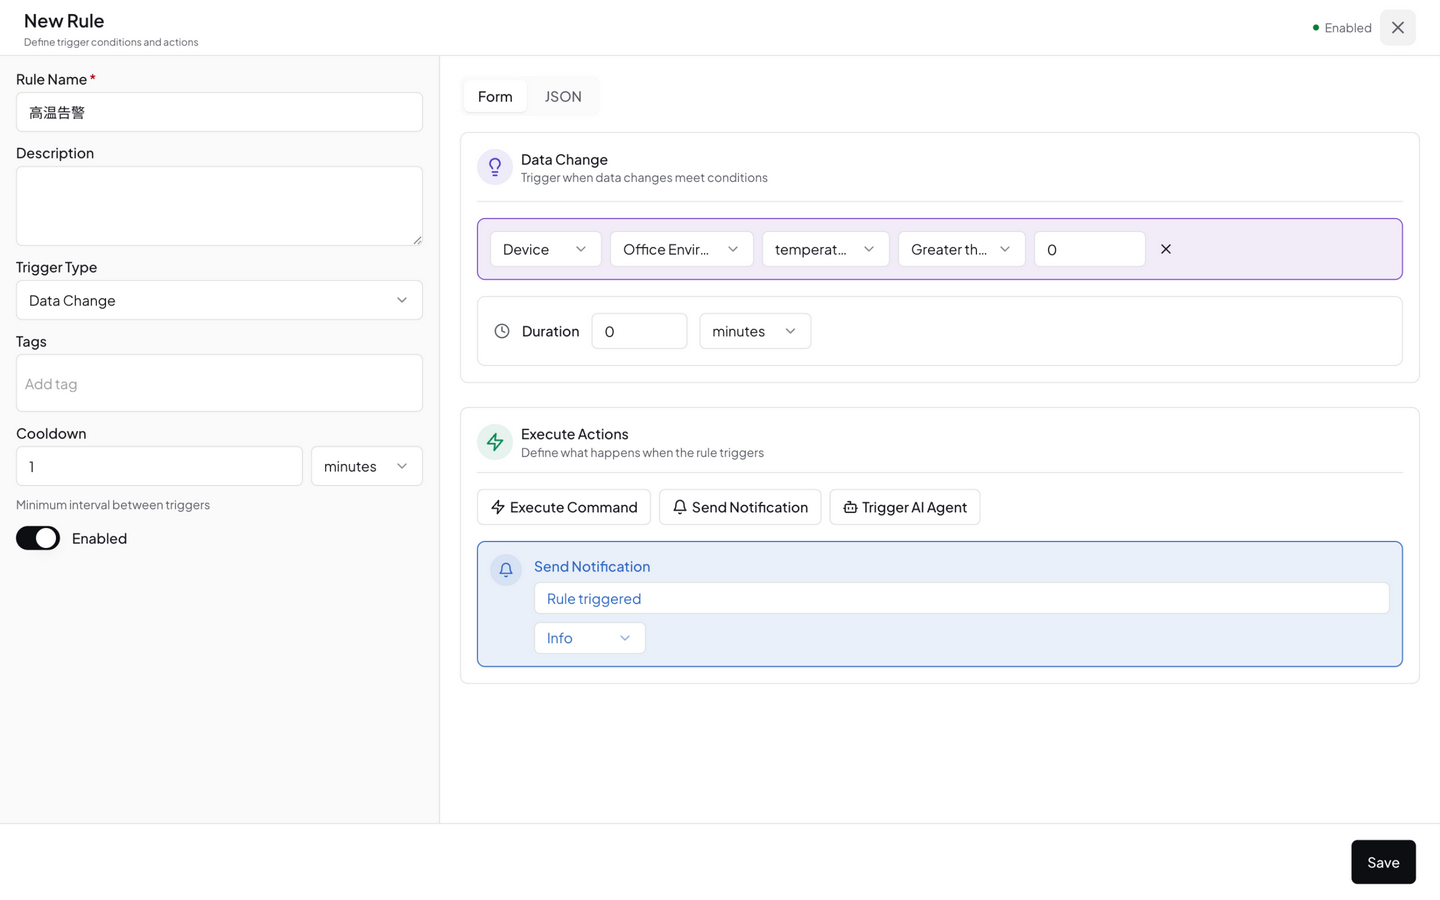
条件决定规则何时触发。支持三种类型:
比较条件(comparison)——值与阈值比较:
| 运算符 | 含义 | 阈值字段 |
|---|---|---|
greater_than | 大于 | threshold(数字) |
less_than | 小于 | threshold(数字) |
greater_equal | 大于等于 | threshold(数字) |
less_equal | 小于等于 | threshold(数字) |
equal | 等于 | threshold(数字/布尔) |
not_equal | 不等于 | threshold |
contains | 包含(字符串) | threshold_value(字符串) |
starts_with | 前缀匹配 | threshold_value |
ends_with | 后缀匹配 | threshold_value |
regex | 正则匹配 | threshold_value |
source 使用 DataSourceId 格式 {type}:{id}:{field},如 device:sensor-01:temperature。
范围条件(range)——值在某区间内时触发:
{ "condition_type": "range", "source": "device:sensor-01:temperature", "min": 20, "max": 25 }
逻辑组合(logical)——AND / OR / NOT 嵌套多个子条件:
{
  "condition_type": "logical",
  "operator": "and",
  "conditions": [
    { "condition_type": "comparison", "source": "device:sensor-01:temperature", "operator": "greater_than", "threshold": 30 },
    { "condition_type": "comparison", "source": "device:sensor-01:humidity", "operator": "less_than", "threshold": 20 }
  ]
}
步骤 4:配置动作
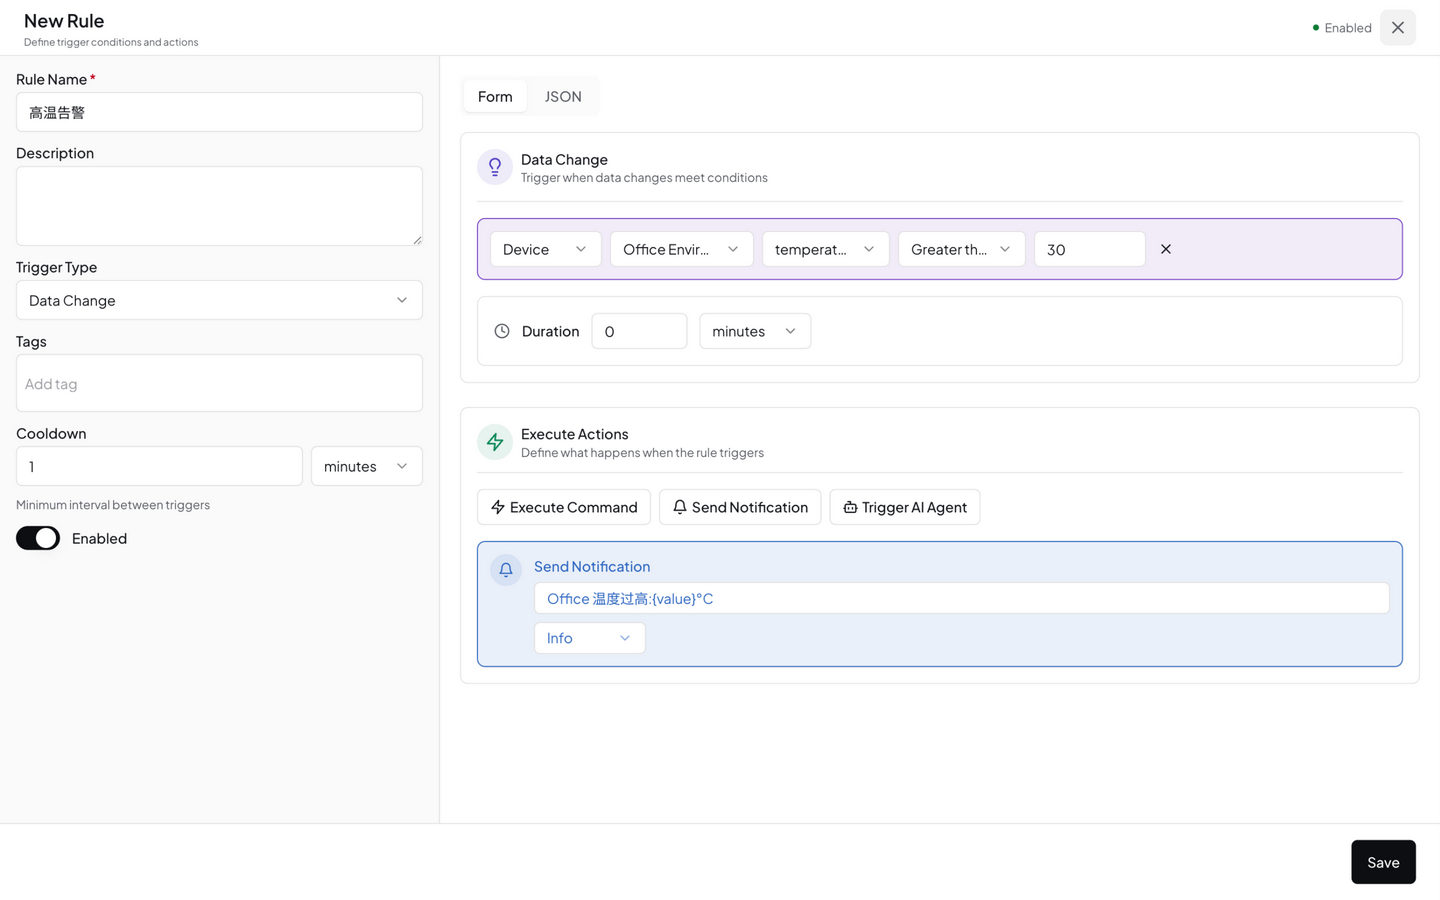
条件满足后执行的操作。一条规则可以有多个动作,按顺序执行。
| 动作 | type 值 | 说明 |
|---|---|---|
| 发送通知 | notify | 消息模板支持 {value}、{source_id} 插值 |
| 执行指令 | execute | 下发控制指令到设备或扩展 |
| 触发 Agent | trigger_agent | 调用 AI Agent 做深度分析 |
| 运行算子 | run_operator | 运行一个结构化模式(L0)Agent——它自行收集绑定数据源、按输出 schema 产出字段,无需 input(见 AI Agent) |
notify 动作——severity 取值:info、warning、critical、emergency
{ "type": "notify", "message": "温度过高:{value}°C", "severity": "critical" }
execute 动作——下发设备控制指令:
{ "type": "execute", "target": "humidifier-01", "target_type": "device", "command": "power_on", "params": { "level": 3 } }
trigger_agent 动作——调用 AI Agent:
{ "type": "trigger_agent", "agent_id": "diagnostic", "input": "sensor-03 离线,请诊断原因" }
除 input 文本外,还可选传 data 字段(JSON 对象)把触发上下文数据一并带给 Agent:
{ "type": "trigger_agent", "agent_id": "diagnostic", "input": "请诊断", "data": { "source": "device:sensor-03:online", "value": 0 } }
步骤 5:持续时间与冷却
| 字段 | 说明 |
|---|---|
| For Duration(持续时间) | 条件必须持续满足该时长后才触发,避免传感器抖动误报。JSON 中单位为毫秒(如 5 分钟 = 300000;UI 中可选秒 / 分钟 / 小时) |
| Cooldown(冷却时间) | 两次触发之间的最小间隔,JSON 中单位为毫秒,默认 60000(60 秒) |
配置完成后点击 Save 保存规则。
方式二:CLI
# 创建规则(JSON 格式)
neomind rule create --body '{"name":"高温告警","trigger":{"trigger_type":"data_change"},"condition":{"condition_type":"comparison","source":"device:sensor-01:temperature","operator":"greater_than","threshold":30},"actions":[{"type":"notify","message":"温度过高"}]}'

# 列出所有规则
neomind rule list

# 启用 / 禁用规则
neomind rule enable <rule_id>
neomind rule disable <rule_id>

# 模拟评估规则(只评估条件是否满足,不触发动作)
neomind rule test <rule_id> --input '{"temperature": 35}'

# 删除规则
neomind rule delete <rule_id>
方式三:REST API
# 创建规则(JSON body)
curl -X POST http://localhost:9375/api/rules \
  -H "Content-Type: application/json" \
  -d '{
    "name": "高温告警",
    "trigger": { "trigger_type": "data_change" },
    "condition": { "condition_type": "comparison", "source": "device:sensor-01:temperature", "operator": "greater_than", "threshold": 30 },
    "actions": [ { "type": "notify", "message": "温度过高" } ]
  }'

# 查看执行历史
curl http://localhost:9375/api/rules/<rule_id>/history
方式四:AI Chat
直接对 AI Chat 说:
「温度超过 30 度时给我发邮件」
LLM 会自动生成规则并创建。
导入 / 导出
Rules 页签右上角的 Import / Export 按钮支持批量管理:
| 操作 | 说明 |
|---|---|
| Export | 导出所有规则为 JSON 文件(neomind-rules-YYYY-MM-DD.json) |
| Import | 上传 JSON 文件批量导入规则;无法导入的规则(如格式错误)会计入"跳过"并在结果中报告 |
规则验证
创建规则时,NeoMind 会做上下文感知验证:
- 规则引用的设备是否存在
- 指标名是否合法
- 指令参数是否匹配设备类型定义
- 扩展与 Agent ID 做非空校验
验证失败会返回详细的错误信息,列出具体哪个字段有问题。
完整示例
1. 温湿度联动告警
温度高且湿度低时,发通知并打开加湿器:
{
  "name": "温湿度联动",
  "trigger": { "trigger_type": "data_change" },
  "condition": {
    "condition_type": "logical",
    "operator": "and",
    "conditions": [
      { "condition_type": "comparison", "source": "device:sensor-01:temperature", "operator": "greater_than", "threshold": 30 },
      { "condition_type": "comparison", "source": "device:sensor-01:humidity", "operator": "less_than", "threshold": 20 }
    ]
  },
  "actions": [
    { "type": "notify", "message": "高温低湿:{value}°C", "severity": "critical" },
    { "type": "execute", "target": "humidifier-01", "target_type": "device", "command": "power_on", "params": { "level": 3 } }
  ]
}
2. 定时能耗播报
每天早上 8 点触发 Agent 汇总能耗:
{
  "name": "每日能耗播报",
  "trigger": { "trigger_type": "schedule", "cron": "0 8 * * *" },
  "actions": [
    { "type": "trigger_agent", "agent_id": "energy-reporter", "input": "汇总昨日能耗并发送日报" }
  ]
}
3. 持续异常触发 Agent
设备离线超过 10 分钟,触发 Agent 诊断:
{
  "name": "设备离线诊断",
  "trigger": { "trigger_type": "data_change" },
  "condition": { "condition_type": "comparison", "source": "device:sensor-03:online", "operator": "equal", "threshold": 0 },
  "for_duration": 600000,
  "actions": [
    { "type": "notify", "message": "sensor-03 已离线 10 分钟", "severity": "critical" },
    { "type": "trigger_agent", "agent_id": "diagnostic", "input": "sensor-03 离线,请诊断原因" }
  ]
}
执行历史
在 Rules 页签点击任意规则的操作菜单可查看执行历史:
- 触发时间
- 条件是否满足
- 执行了几个动作
- 每个动作的结果(成功/失败/原因)
- 评估耗时
与其他模块联动
| 联动 | 说明 |
|---|---|
| 通知 | notify 动作路由到已配置的通知渠道 |
| AI Agent | trigger_agent 动作调用自主智能体做深度分析 |
| 设备 | execute 动作下发设备指令 |
| 数据转换 | 规则可引用 Transform 生成的派生指标 |
| 数据推送 | 规则在平台内评估数据并触发动作;数据推送把数据发送到平台外 |
| AI Chat | 自然语言创建规则,LLM 自动生成 JSON |
最佳实践
- 加
for_duration防抖:传感器数据有噪声,用"for_duration": 120000(2 分钟)过滤瞬时波动(单位为毫秒) - 设
cooldown防刷屏:高频数据源配合冷却时间,防止告警风暴 - 分级通知:普通告警
severity: "info",严重告警severity: "critical" - 优先用规则而非 Agent:确定性逻辑用规则(毫秒级评估),模糊判断才用 Agent(秒级 LLM 分析)
- 动作幂等:设备指令设计为幂等(如
power_on多次调用安全),防止规则重试产生副作用
下一步
最后更新: 2026-10-21